Adding Google Sign-in to your webapp in 2025

Gotten stuck in a rabbit hole figuring out how to add "Log In with Google" to your web app?
This was an earlier series on my site from way back, but it looks like the landscape has changed so much - its worth trying to address how to do simple things like sign-in with google and use google oauth.
In this series now updated for 2025, I'll cover:
- why you might want to use the Sign-In for Website JS library, and getting started with it
- Adding the library via javascript
- adding it to an existing project (angular & react)
Their docs give you a decent place to start if you know what you're looking for, but there's a few areas where their docs and other guides online can be confusing. There's also minimal guidance as to how to use it within existing projects.
- Am I supposed to be following the Google Identity docs or do I need Google Sign-in for Web??
- Wait, why are those 2 guides so different?
- This should be simple! I'm just trying to load a users avatar!!
"How do I add Log in with Google?" is a very loaded question, but we can distill it down to these 3 use cases
- Do you just want to be able to see the users name and picture, maybe their email from an HTML page? Use the Sign-In with Google for Web (full walkthrough below).
- If you are using a third-party authentication platform such as Firebase, Auth0, OneIdentity, use the OpenID Connect protocol
- Do you have your own database of users, and you want to add Google as a login option? The Sign-In with Google for Web may be the right option.
- Do you want to be able to interact with the users Google account and do things like see their calendar, or create a Google doc? You'll need to use their OAuth protocol.
For the purposes of this post, I'm going to explore the Sign-In with Google for Web GSI library which uses the OpenID Connect protocol.The goal of this authentication library is to let you identify a user with their Google account on a web page. Thats it.
So when should I Sign-In with Google for Web?
Good reasons to use it:
- you have some content stored on a backend service that you deliver via an API only after the user has signed in
- you only have to support Google/G-Suite users
- you dont need to authorize users (e.g. allow some users to be admins)
- your site is public
- you have a single-page/static app
When not to use it:
- you want to access a Google service on behalf of a user such as reading a doc/spreadsheet, search Drive, or send a Gmail.
- you are using an existing authentication system with Google support such as Firebase, Keycloak, Auth0
Use cases where it's worth considering using the OAuth 2.0 Flow instead:
- you have pre-existing user content stored on a backend service
- you have an internal site that you want to restrict to users from a specific domain. (e.g. only users from @example.com should see it)
- you want to prevent people from seeing your page unless they've logged in. The best you can do with this library is show/hide elements on the page if the user logged in, but thats enough if you only load data from an API after a user has logged in but not for gating static content.
These use cases require server-side handling alongside a working Sign-In with Google implementation. (Coming soon!)
The library is designed to be used with HTML/JS and only interacts with your page via the "Sign in with Google" button. You can integrate this with other frameworks like Angular/React which I'll be covering in the next part of this series.
Demo Overview
Here's what we're going to build, you can try it yourself with the interactive demo below
You can click on the sign in button, display some data about the user including their avatar, and then offer a way to sign out.
Get your Google Sign-In Client Credentials
Before adding in the button, you first need to create a client ID/secret which is a way of identifying that you, the developer, are allowing users to get the identity information from Google and delivered to your website.
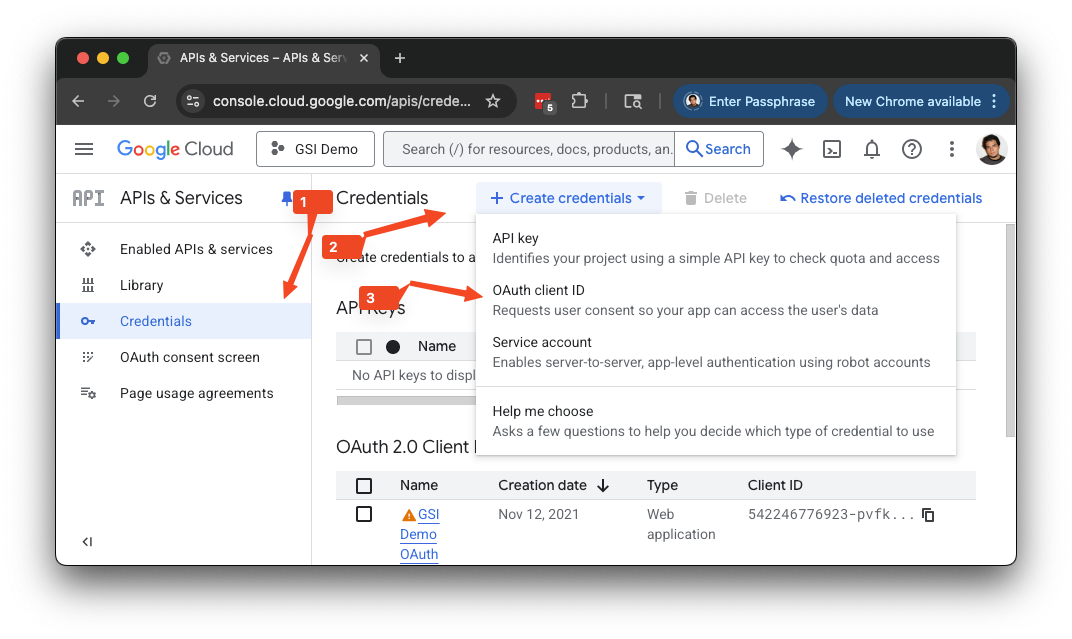
- Go to the Google API Console - https://console.developers.google.com/apis/dashboard
- Create a new project, or use an existing project if you already have one set up.
- Then click on Credentials -> Create Credentials -> OAuth Client ID
Here's what I put in for this demo:
Name: google-auth-demo
Authorized Javascript Origins:
http://localhost:8000http://localhost
Authorized Redirect URIs: You can ignore for the purpose of this post.
⚠️ If you have a plain HTML file that you load in your browser using a file path like /home/dperez/index.html, this won't work.
You'll need to "serve" your website so that you have a URL, even if its just localhost. You can use
python -m http.server 8000to serve up your current directory or you can use an npm package like http-server.
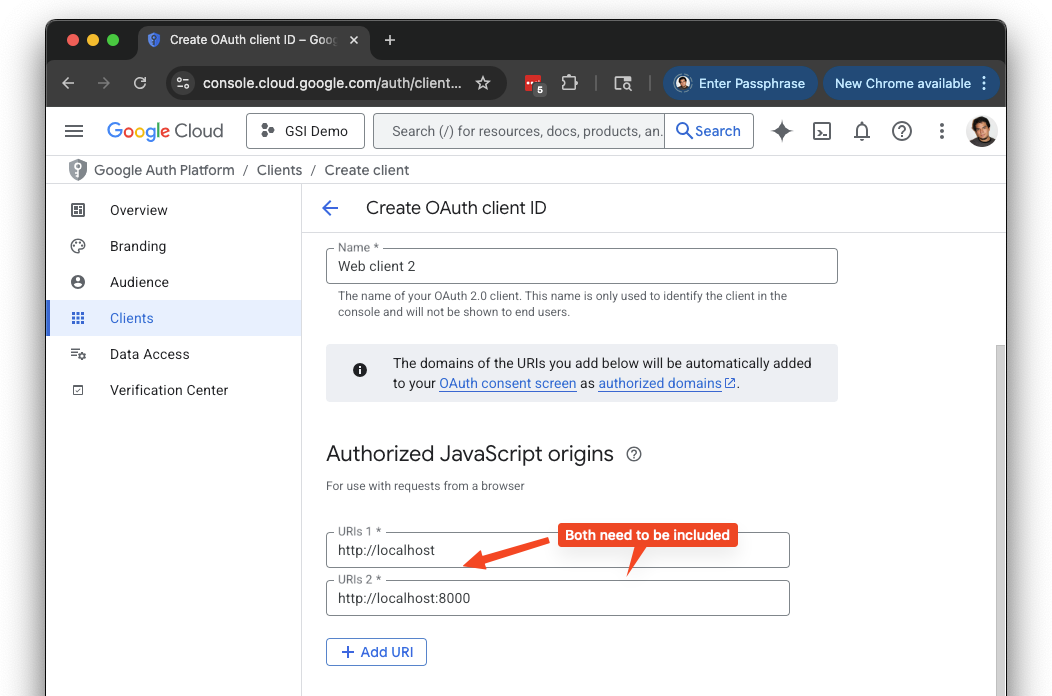
⚠️ You must explicitly add
http://localhostto your Authorized Javascript Origins, IN ADDITION TO the URL that you're actually using.So I need to add BOTH
http://localhostandhttp://localhost:8000
You'll then get a Client ID & Client Secret. These are 2 identifiers for your Oauth Client. At this point, you have authorized that Client ID to accept logins and return you the users information. You'll only need the Client ID for the rest of this walkthrough.
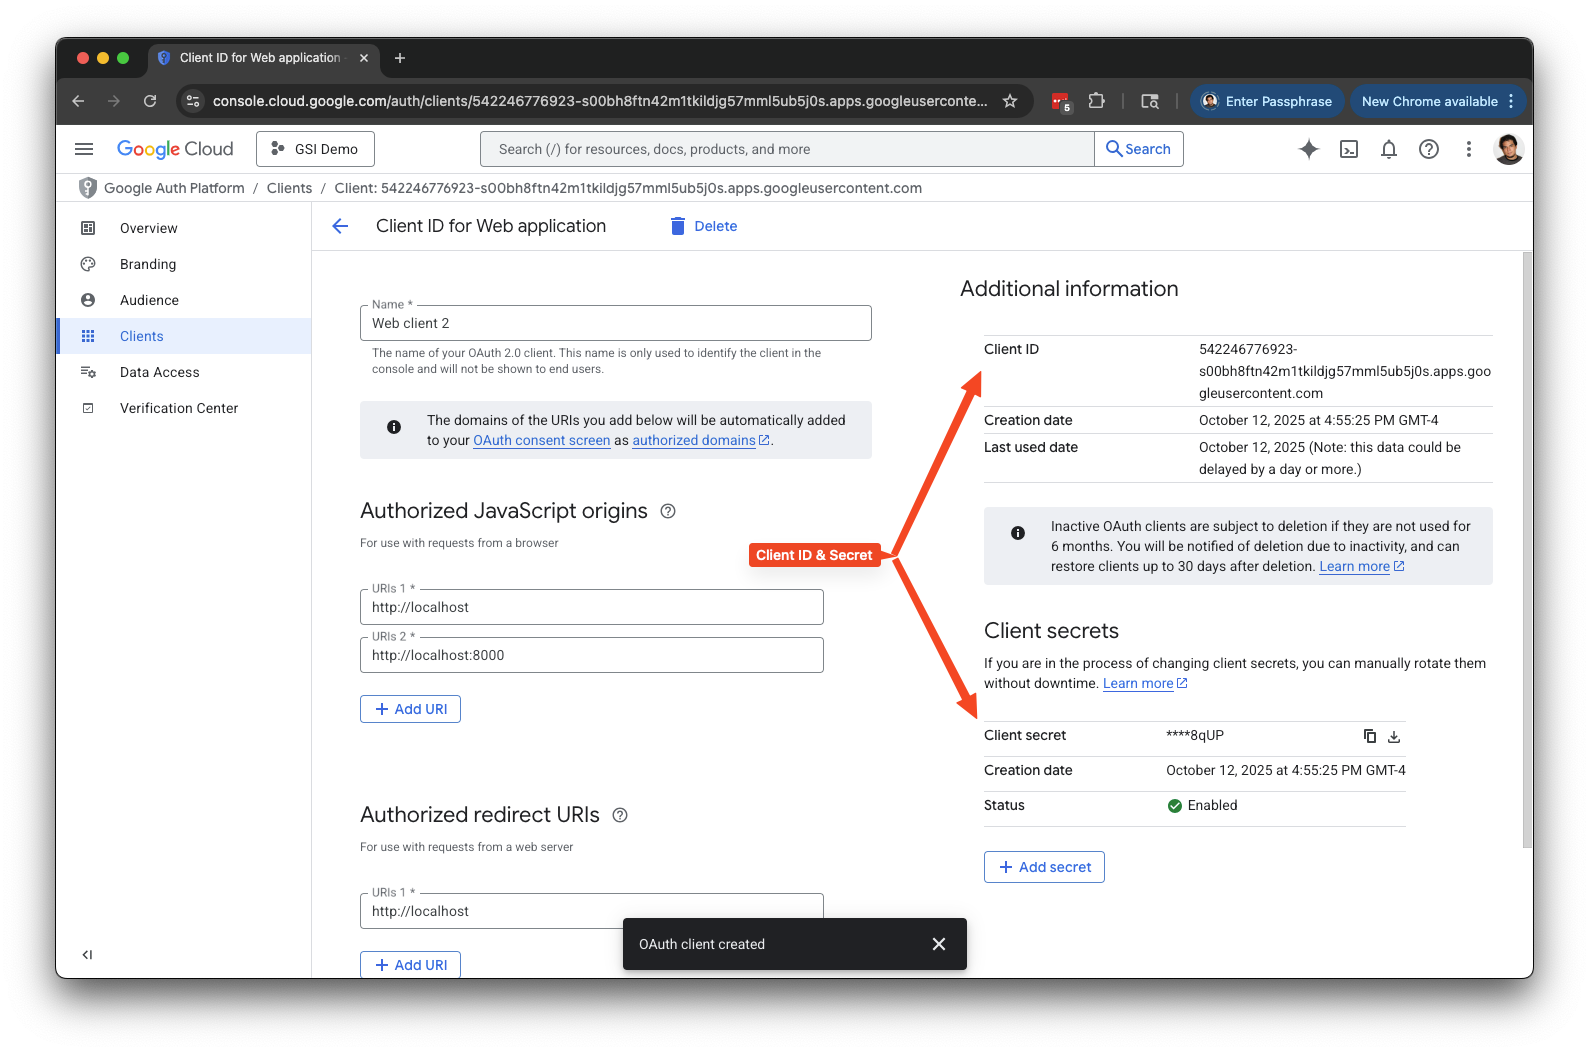
Theres a warning that says as of June 2025, you can no longer view your client secret after you leave this page. For the purpose of this walkthrough, we don't need it. If you wind up needing it later, you can click on Add Secret to create a new one. However, I'm still able to get to it in the screenshot.
At this point, you have a Client ID available and you can proceed!
Add the Google Sign-In Button
Theres 2 main methods for setting it up, plain HTML and a JS implementation. I'll walk through both, whether one works better than the other depends on what you're trying to do with it.
Plain HTML
The Plain HTML method requires setting up 2 HTML elements that will initialize and dynamically replace itself with the google sign in button.
You can start with an empty index.html file with the contents below
<!DOCTYPE html>
<html>
<body>
  <h1>Welcome to the Demo</h1>
</body>
</html>
Add the library + credentials + button to your HTML
In your index.html page, add the following to your HTML page:
...
<head>
  ...
  <script src="https://accounts.google.com/gsi/client" async defer></script>
</head>
<body>
  <h1>Welcome to the Demo</h1>
  <div id="g_id_onload"
      data-client_id="YOUR_CLIENT_ID.apps.googleusercontent.com"
      data-auto_prompt="false">
  </div>
  <div class="g_id_signin"
        data-type="standard"
        data-size="large"
        data-theme="outline"
        data-text="sign_in_with"
        data-shape="rectangular"
        data-logo_alignment="left">
</body>
The script tag grabs the GSI library from Google using async defer which means that the rest of your application can load while this library is downloaded to your browser and will not prevent the page from loading.
Once that library is loaded, it will automatically search for 2 elements with ID g_id_onload and g_id_signin.
The g_id_onload div element is where you will add the Client ID that you previously generated in the console. There are other options that you can set, more described here
The g_id_signin div element lets you define additional attributes to control the look and feel of the button. It also lets you "connect" your button to any of your Javascript code. A listing of all the available attributes to define are described here
At this point, if you refresh your page, you should see a pretty Sign-In button. If you click it, you'll go through your Google Login flow in a popup.
Now, lets add a callback - this is how you can tap into the sign-in flow and get info about the user.
<div id="g_id_onload"
      data-client_id="YOUR_CLIENT_ID.apps.googleusercontent.com"
      data-callback="handleCredentialResponse"
      data-auto_prompt="false">
...
<script>
  function handleCredentialResponse(response) {
    console.log("Encoded JWT ID token: " + response.credential);
  }
</script>
🎉 That works. I am able to see the token in the console
Troubleshooting:
- Loading the page, I get through a successful sign-in and I see the log statement with the token information. However, I don't see the button change appearance.
I came across this Stack Overflow issue - https://stackoverflow.com/questions/68438293/the-given-origin-is-not-allowed-for-the-given-client-id-gsi which states that in the Google Client ID settings, you need to
- include both
http://localhostandhttp://localhost:8000. - I was using
http://127.0.0.1:8000so the origin didn't match. - Once I accessed the site using
http://localhost:8000instead, it saw that I was already signed in. And updated the state of the button. Win!
HTML + JS Method
We'll try the Javascript implementation now. In this method, you add the HTML element that you want to be replaced, and then you initialize it using javascript.
<body>
  <h1>Welcome to the Demo</h1>
  <div id="gsi_button"></div>
  <script>
    function handleCredentialResponse(response) {
        console.log("Encoded JWT ID token: " + response.credential);
      }
      window.onload = function () {
        google.accounts.id.initialize({
          client_id: "YOUR_CLIENT_ID.apps.googleusercontent.com",
          callback: handleCredentialResponse
        });
        google.accounts.id.renderButton(
          document.getElementById("gsi_button"),
          { theme: "outline", size: "large" }  // customization attributes
        );
      }
  </script>
</body>
When the window loads, we'll run google.accounts.id.initialize() with the Client ID we created earlier. We'll also run renderButton() which will replace #gsi_button with the official google one.
Show some user data
In the 2 examples above, we defined a callback called handleCredentialResponse, this allows us to get the details about the user after signing in.
function handleCredentialResponse(response) {
  console.log("Encoded JWT ID token: " + response.credential);
}
An ID token is usually a string of some kind usually containing json that is encoded using base64 to make it easy to share around as a string. If we add jwt_decode to the project, we can easily read the info in the token
For the purposes of the demo, I'm pulling it in from unpkg
<head>
  <script src="https://unpkg.com/jwt-decode@3.1.2/build/jwt-decode.js" async defer></script>
  ...
</head>
const decoded = jwt_decode(response.credential);
console.log("Decoded payload:", decoded);This shows the result
{
    "iss": "https://accounts.google.com",
    "azp": "1006632388683-oe9a58l64grlf5cdecdjjna9rvu7vliv.apps.googleusercontent.com",
    "aud": "1006632388683-oe9a58l64grlf5cdecdjjna9rvu7vliv.apps.googleusercontent.com",
    "sub": "108716981921401766503",
    "email": "user@example.com",
    "email_verified": true,
    "nbf": 1757556093,
    "name": "danny perez",
    "picture": "https://lh3.googleusercontent.com/a/ACg8ocKXJnZr6LWNfdACAQGFvVVNSaWYS4_Ghq7Ap-JM-7O-dzLkhNqQ=s96-c",
    "given_name": "danny",
    "family_name": "perez",
    "iat": 1757556393,
    "exp": 1757559993,
    "jti": "6cb3411828a7c3bd2fa21816ba94a6f385419e1d"
}
Aha! There is the link to my picture that I can display on my page now!
// Display user information
const userInfo = document.getElementById('user-info');
const userAvatar = document.getElementById('user-avatar');
const userName = document.getElementById('user-name');

userAvatar.src = decoded.picture;
userName.textContent = decoded.name;
userInfo.classList.add('visible');

// Hide the sign-in button
document.getElementById('gsi_button').style.display = 'none';
Sign out
With the Google Sign-In button, theres no such thing as "Sign out".
If you want to sign out of your Google account, you would do that from a Google site and that will log you out of all your browser sessions.
We can then make our sign-out button just update the state on the page to show the button again, allowing you to switch accounts.
Add a button after the user has signed in by adding a button in your index.html and the click handler in your javascript.
<body>
...
  <button onclick="signOut()">Sign out</button>
</body>
function signOut() {
// This prevents a redirect loop if you have
// auto-select enabled
google.accounts.id.disableAutoSelect();
// Hide user info
const userInfo = document.getElementById('user-info');
userInfo.classList.remove('visible');
// Show the sign-in button again
document.getElementById('gsi_button').style.display = 'flex';
// Clear user data
document.getElementById('user-avatar').src = '';
document.getElementById('user-name').textContent = '';
console.log('User signed out');
}At this point, we've added a Sign-In with Google button and we can identify the user by name/email. Since there's no sign-in, we just reset the state of the page.
...but what about basic things like saving users data to the backend? or showing an admin page?! Why isn't this in the docs?! That'll be covered on the next post!